Manage Campaign Waves
|
Content
|
|---|
Overview
Campaign Waves represent all activities being done in the duration of the campaign.
Record Campaign Activities
- From the CRM module, click Campaign > New Campaign Wave button from the menu options.
- From there, you can see the list of campaigns on the Active Campaign tab. Select by double clicking on specific campaign. The Campaign Wave form will display.
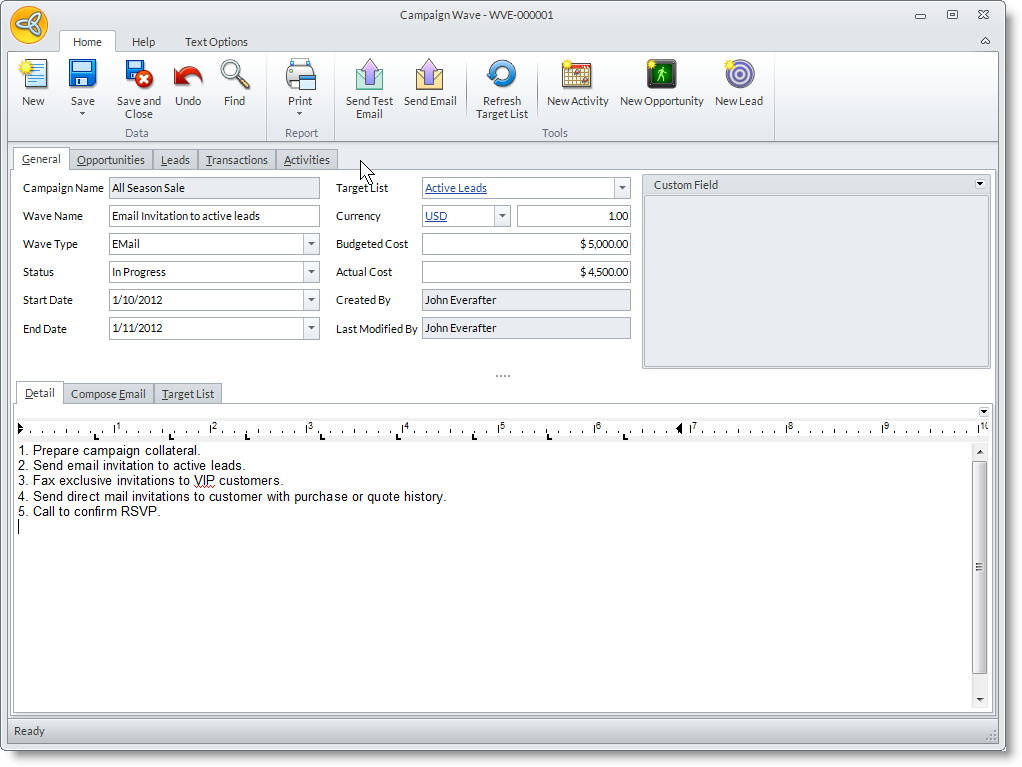
Campaign Wave Fields
Definition
Campaign Name
Specify the name of the campaign.
Wave Name
Specify the campaign wave name.
Wave Type
Specify the wave type that matches the nature of the activity. The options are: Fax, Email, Mail Merge and Call.
Status Specify the progress of the campaign. The default status of the campaign is Not Started. Start Date Set the date when the campaign begins. By default, this is also set to the current date. End Date Set the date as to when the campaign will end. By default, this is also set to the current date. Target List Currency / Amount Specify the currency used and the amount. Budgeted Cost Enter the allotted expense amount for the campaign based on the currency set in the Currency field. Actual Cost Enter the actual cost incurred after the campaign activity ends. Created By Sepecify the user who initially recorded the campaign. Last Modified By Specify the user who made the latest changes to the campaign record. - In the Details tab, enter as many details of the campaign wave activity.
- Optional: In the Opportunities tab, you can create and manage opportunities related to the campaign wave.
- Optional: In the Activities tab, you may create and manage activities related to the campaign wave.
- Optional: In the Leads tab, you can create new leads generated from the campaign activity. Click on the New Lead button to display the Lead form.
- In the Transactions tab, you can view a history of quotes and sales orders linked to the opportunities.
- Click Save and Close.
- For the different wave types, see Send Fax, Send Email, Send Letters through Mail Merge, Outbound Call
Manage Opportunities Related to the Campaign Wave
- In the Campaign Wave form, go to the Activities tab. The Activity tab works as the Activity Calendar that you can use to schedule and maintain activities related to the opportunity.
- To create a new activity you can do one of the following:
- Click on the New Activity button from the menu of the Activities tab. The Activity form will display. The Start Dateis set to default current date.
- Double-click on a day or time in the Activity Calendar. The Activity form will display. The Start Date is set to the selected date in the calendar. See Also: View Activity Calendar
Manage Activities Related to the Campaign Wave
The Activities tab works the same as the Activity Calendar where you can schedule new activities and view them in the calendar. Only the activities created from the Campaign Wave form will be shown in the calendar and lists. To create a new activity,
- Do any one of the following:
- Click on the New Activitybutton.
- Click on the New Activity button from the toolbar menu of the Activities tab.
- Double-click on a day or time in the calendar.
- The Activity form will be displayed.
See Also: Schedule and Manage Activities
![]()
Sending Fax Messages
If Fax is set as Wave Type, the Compose Fax tab is displayed. From this tab, you may compose html or plain text documents to send via web service fax. You can use the fax composer to create new fax message from scratch, from templates or from prewritten documents.
Steps
- In the Compose Fax tab, type in the Subject and Message in the word processor area.
- There are two sliding panels you can use.These are the options:
- Templates
Use this pane to select from available message templates. To use a template, click on a template in the list. Note: This will overwrite the content already in the Fax Composer. - Merge Fields
Use this pane to select and add mail merge fields. To see the mail merge fields, you will need to select a target list. Click on the Mail Merge pane and click on the Refresh button. Place your cursor where you want to add the mail merge field. In the Mail Merge field pane, double-click on the mail merge field.
- Templates
- You can open prewritten documents using the Open button from the toolbar menu of the Compose Fax tab. Note that this will replace the current content of this tab.
- Optional: You may add attachments by clicking on the Attachments button. You can attach documents from the computer or from the Document Management.
- Select the fax recipients by selecting a target list in the Target List field. Then go to the Target List tab to include/exclude contacts.

Note that following when sending to contacts:
- Contacts that have allowed to be sent with fax messages (OK to Fax) will be included in the fax recipients. You can still include contacts in the Target List tab.
- Only those that have a fax number information will be added as recipients and sent the message.
- The priority fax number is the default contact's. If there is no fax number set up for the default contact, then the entity's primary fax number is used.
- Optional: You can send a test fax to your email account by using the Send Test Fax option. Click on this option to display the Send Fax window. Confirm the Email Account you will send it to and enter the enter the Test Fax Number. Click Send to start sending the test fax.
- Save the details before sending the actual fax message or closing the Campaign Wave form.
- Click on the Send Fax option from the toolbar menu to send the fax message. The Send Fax window will show the progress of sending the email and will report any error. The fax message will be sent to "fax number"@fax.tc.
Set Up Web Service Fax Account
- Select Preferences under the Setup menu of the System Manager module.
- From the Preferences form, use the link for new registration to go to the InterFAX registration page.
See Also: Fax Accounts
View Sent Fax Messages
- From the main toolbar of Connected Business, click on the Mail button. The Connected BusinessEmail form will display.
- Select the email account from the Folders list to view the email folders.
- Select Sent Items to view the sent email and fax messages. Fax messages will have a fax icon before the recipient fax number.
See Also: Manage Fax
![]()
Sending Email Messages
If Email is set as Wave Type, the Compose Email tab is displayed. From this tab, you will be able to compose HTML and plain text emails and send via Connected BusinessEmail. You will be able to create email messages from scratch, from templates or from prewritten documents.
Steps
- In the Compose Email tab, type in the Subject and Message in the word processor area.
- There are two sliding panels you can use.These are the options:
- Templates
Use this pane to select from available message templates. To use a template, click on a template in the list. Note: This will overwrite the content already in the Fax Composer. - Merge Fields
Use this pane to select and add mail merge fields. To see the mail merge fields, you will need to select a target list. Click on the Mail Merge pane and click on the Refresh button. Place your cursor where you want to add the mail merge field. In the Mail Merge field pane, double-click on the mail merge field.
- Templates
- You can open prewritten documents using the Open button from the toolbar menu of the Compose Email tab. Note that this will overwrite the content in this tab.
- Optional: You may add attachments by clicking on the Attachments button. You can attach documents from the computer or from the Document Management.
- Select email recipients by selecting the target list in the Target List field. Then, go to the Target List tab to include/exclude recipients. Note the following when sending email messages.
- Contacts that have allowed to be sent email messages (Ok to email) will be included in the email recipients.
- Only those that email address information will be added as recipients and sent the email message.
- The priority email address is the default contact's. If there is no fax number setup for the contact, the entity's primary email address is used.
- Optional: You can send a test email to your email account by using the Send Test Email option. Click on this option in the toolbar menu to display the Send Test Email window. Confirm the Email Account to send to and the Test Email Address. By default, it will be sent to your default email account in Connected Business.
- Save the campaign activity before sending the email.
- Click on the Send Email button from the menu to start sending the email messages. The Send Email window will show the progress of sending the email and will report any error.
Set Up Email Accounts
Setting up email accounts can be done in two ways:
- From the Connected Business Email form
Click on Tools > Email Accounts to display the Email Account Wizard. - From the User Accounts form
- From the System Manager module, click on Accounts > My Account.
- On the My Account form, click on Email tab.
- Click on the New button from the menu to display the Email Account Wizard.
- Click Save and Close.
View Sent Emails
- From the CRM module, click on Mail button from the menu. The The Connected Business Email form will display.
- Select the email account from the Folder list to view the email folders.
- Select Sent Items to view the sent email and fax messages.
Sending Letters through Mail Merge
If Mail Merge is set as Wave Type, the Write Letter tab is displayed. In this tab, you will be able to compose mail merge letters. You can compose mail merge letters from scratch, from templates or prewritten messages.
Steps
- In the Write Letter tab, type in the Subject and Message in the word processor area.
- Optional: You can use template documents if available. Click on the Open button from the toolbar menu and browse for the document to import. You may import documents in RTF, text and Microsoft Word, HTML or XML formats.
- Select message recipients by selecting the target list in the Target List field. Then, go to the Target List tab to include/exclude the recipients.
- Save the campaign wave before creating the mail merge letters.
- Click on Write Documentfrom the options menu to display the Connected BusinessWord. The merge fields are filled in with the information from your target list.
- From the Connected BusinessWord, you may amend the message before saving or printing.
![]()
Schedule an Outbound Call
If Call is set as Wave Type, the Outbound Call Details tab will be displayed. From this tab, you can assign users and teams that will make the outbound calls.
Steps
- In the Outbound Call Details tab, enter the Daily Call Target.
- Assign users and teams to call the contacts. In the Users section, select the users that were assigned to make a call.
- In the Teams section, select the teams that were assigned to call the contact. All users in the team will be included in the Outbound Call activity.
- Select the contact to call by selecting the target list in the Target List field. Then go to the Target List tab to include/exclude recipients.
When making an outbound call:
- Contacts that have allowed to be called (OK to Call) will be included in the call list. You can include contacts in the Target List tab.
- The priority phone number is the default contact's. If there is no phone number setup for the contact, the entity's primary phone number is used.
Perform an Outbound Call
- To open the outbound call interface, select Outbound under the Record menu page group. The Outbound Call list will display. Note that to be able to see the outbound call record, the outbound call record should have a target list specified.
- Select a record in the list to display the Outbound Call form.
- As you start calling contacts, click on Get a Call button from the toolbar menu. The contacts will display in their order in the target list. The Contact Name, Entity and Business Phone Number will display in the General tab.
- Click on Got Through button after speaking with the contact or Cancel Call button if otherwise.
- Click on Get a Call to call another contact.
- You may view the call summary by clicking on the Summary option.
Schedule a Call Back
- In the Outbound Call form, To create a callback record, click on the Callback After button. The Create Callback formwill display.
- Set the callback schedule. A callback activity is created. See Also: Callback
View Outbound Call Summary
- Click on the Summary button to display the Summary form. The Summary form displays summary for individual (current user) and team summary.
- You can view call summary of other teams by selecting the team in the Team pulldown.
Follow Up on Campaign Activities
Steps
- From the CRM module, select Campaign > Find Campaign Wave. The Campaign Wave search screen will display.
- Edit the details as necessary or change the campaign wave status.
- Click Save and Close.
Cancel the Campaign Wave
- To cancel the campaign, set the Status to Cancelled.
Close the Campaign Wave
When completed, you may close the campaign wave by:
- Set the campaign Status to Completed.
- Enter a date in the End Date field and save.
View the Wave Calendar
Steps
- From the CRM module, select Campaign > Find Campaign. The Campaign search screen will display.
- Select a campaign record in the list to view the Campaign form.
- Switch to the Waves tab to view the Wave Calendar. The Wave Calendar is similar to the Activity Calendar dashboard.
- Click Home tab then select Save and Close.
Change the Calendar View
- Click on the View Types in the Wave Calendar menu.
View Campaign Activities From Past and Future Dates
- From the sliding panes, click on Date Navigator.
- Move through months and even years by clicking on the Back and Forward buttons.
- Double click on a date to view activities within the specified date.
Filter the Campaign Activities Shown in the Wave Calendar
- From the menu options of the Campaign form, click on Filter Options. The default load saved filter, My Default Filter, shows all activities.
- You can modify the default filter and create new preset filters. To do this, modify the filter by selecting the criteria of what you want it to show e.g. all outbound call campaign activities.
- Specify Date Range. You can select and edit various date options.
- Check options indicated if you want to filter by Wave Type or Status.
- Click Save Filter button to save the changes to the default filter or click on the pulldown arrow button to view the option Save New Filter As. Click on this option to enter the label for the new filter.
- You can apply the filter by selecting from the Load Saved Filter pulldown and clicking on the Apply Filter button.
- Click OK.
View Full Details to the Campaign Wave
- From the Wave Calendar, double-click on the campaign wave record to display the Campaign Wave form.
Update the Campaign Wave Status from the Wave Calendar
- From the Wave Calendar, right-click on the campaign wave record to view the options.
![]()