Schedule Activity
|
Content
|
|---|
Overview
In this process, you will be handling activity schedules and keep track of the to dos, calls, meetings and any activity records.
Activities can be dealings and connections done in order to achieve a business or personal purpose.
Types of activities in Connected Business are to-dos, meetings, calls and callbacks. Activities are further classified by Activity Categories such as work meetings, status meetings, sales visit etc. These activities can be viewed and maintained in the Activity Calendar.
Schedule an Activity
Steps
- From the CRM module, click on the Activity > New Activity. The Activity form will display.
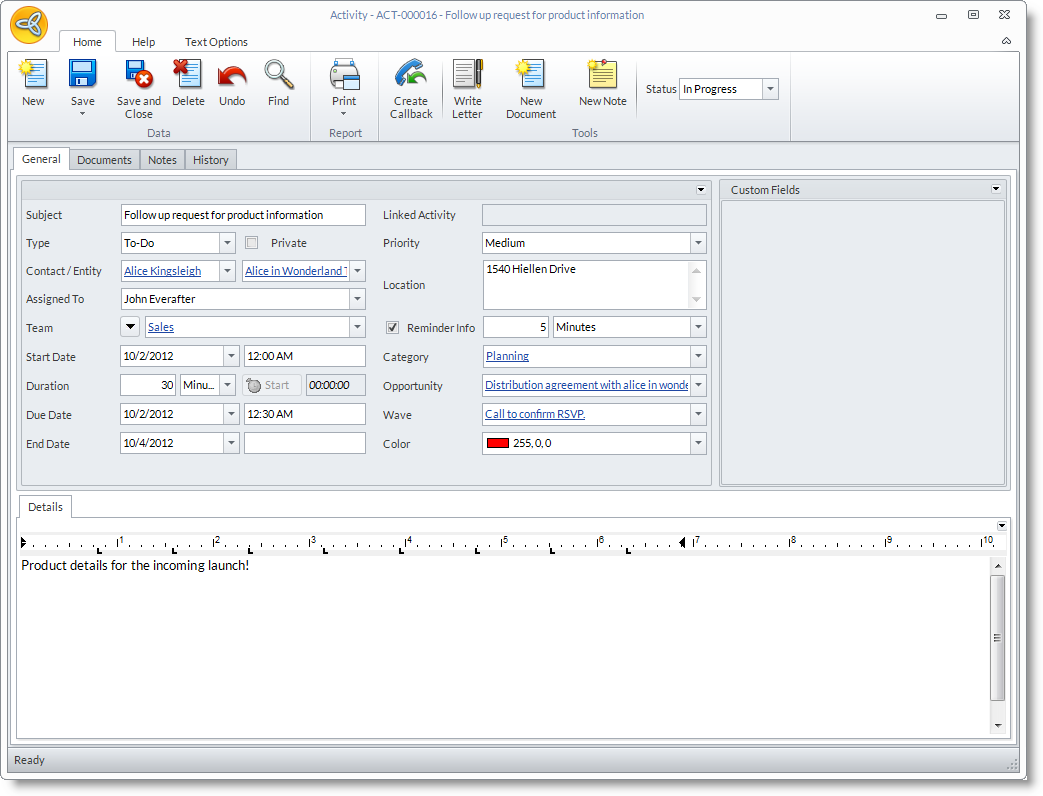
Activity Field
Definition (Sample Values and Notes)
Subject
Type in the purpose for the activity.
Activity Type
The default Activity Type is set to "To-do". You may select activity types from to-do, meeting, phone call and callbacks.
Private
Tick checkbox if you want the activity to be private.
Contact / Entity
Select the entity or contact if the activity involves a contact or entity (Customer, Supplier or Sales Rep)
Assigned To
The user who is currently logged in Connected Business software is the default user assigned to the activity. You can change this information and assign another user for the activity record.
Team
The team in which the user belongs. You can change this information and assign another user for the activity record.
Start Date
The start date is set to the current date. Select the start date according to the schedule of the activity.
Duration
Set the expected duration of the activity.
Timer button
The Timer button can be used in the Call activity type. When taking the call, you can log the time by clicking on this button. Click the Timer button again to stop the timer. The total call time will appear in the field next to the Timer button.
Due Date
The due date is set to the current date. Select the due date according to the schedule of the activity.
End Date
You may enter the end date when the activity is completed. When the activity status is set to “Completed”, the date will appear in this field. Entering a date in the End Date field will set the activity Status to “Complete”.
Linked Activity
The linked activity shows the wave activity related to the activity.
See Also: Manage Campaign WavesPriority
Assign a Priority Level for the activity. You may select priority types from critical, high, medium and low.
Location
Type in the Location where the activity will be held. If a contact or entity is selected for the activity, the entity or contact address will be set to default location.
Reminder Info
If you want to include the activity in the reminders, click on the Reminder Info checkbox and put in the time interval for the reminder to appear. The Reminder pop up window will display the activity that you have setup reminder information.
Category
Select an Activity Category that closely matches the activity. You can define new activity/case categories from Activity Category.
Opportunity
Enables you to view the opportunity record linked to the activity or select an opportunity document that you will link to the activity record.
See Also: Manage Sales OpportunitiesWave
You may select a Campaign Wave document that you will relate to the activity in the Wave field.
See Also: Manage Campaign WavesColor
You may select a Color to indicate this activity in the Activity Calendar. You may assign the same colors for the same activity types.
- In the Details tab, you can fill in as much information as you need about the activity.
- Optional: In the Documents tab, you can attach related documents to the activity. To do this, click on the ellipsis button inside the File Name column and browse for the file to attach.
See Also: Manage Documents - Optional: In the Notes tab, you can write down notes for the activity or add them as the activity progresses.
See Also: Common Elements in the Connected Business module > Notes Form. - For the different activity types, see Meeting | Call | Callback
Let Others Know About the Activity
To share the activity with other colleagues, there are three possible ways:
- Share Printed Documents for the Activity
The activity can be printed out, sent to fax or email recipients allowing you to share your activity planning to all concerned. Click on the Print button to display the Print Dialog window.
See Also: Using the Print Dialog Window - Sending Emails
To compose and send emails, click on Tools > Write Letter from the menu options of the Activity form. You can save the letter into a word document, print to PDF and send via email.
See Also: Manage Business Documents and Letters - Sending Fax Messages
To send activity details through fax, click on the Fax button from the toolbar of the Details section. This displays the Email/Fax Composer.
See Also: Manage Emails | Manage Fax
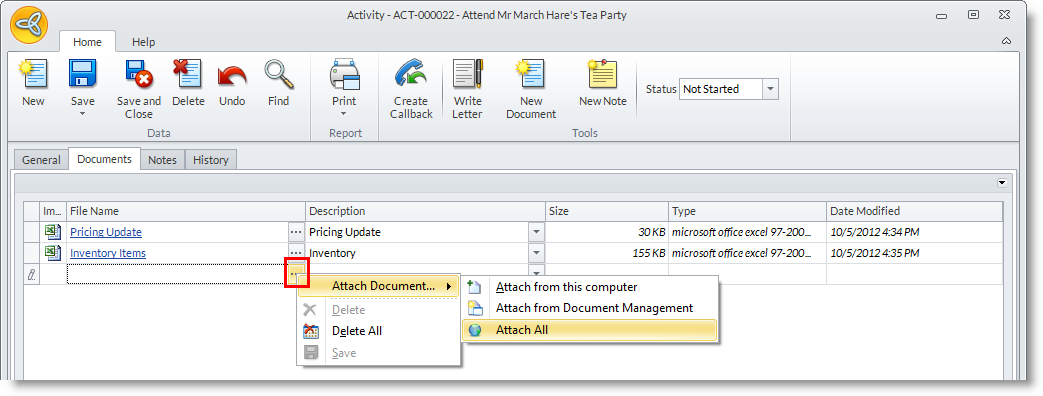
Attach Related Documents
- On the Activity Form, click on Documents tab.
- From the Documents tab, click on the ellipsis button and select from the options to Attach from the Computer, from the Document Management or Attach All.See Also: Manage Documents
Add Notes
- Click on the New Note icon to switch to the Notes tab and load the Notes form.
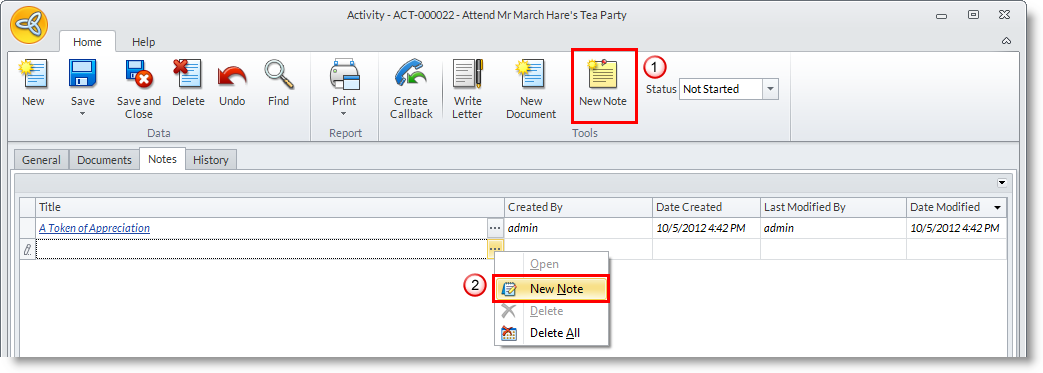
- From the Notes tab, click on the ellipsis button and select New Note to load the Notes form.
View List of To Do Activities
- From the Activity form, you can view the list of activities in the History tab.
- From the Activity Calendar, click on the To-Do button to display the list of To-Do activities.
See Also: View Activity Calendar
To-Dos
- See Also: Schedule an Activity for similar procedure.
Meeting
If Meeting is set as the activity type, the Attendees and Availability tabs are displayed beside the Details tab. These tabs are used to manage attendees and resources to the meeting.
Steps
Manage Attendees and Resources
- Select Meeting as the Activity Type to display the Attendees and Availability tabs.
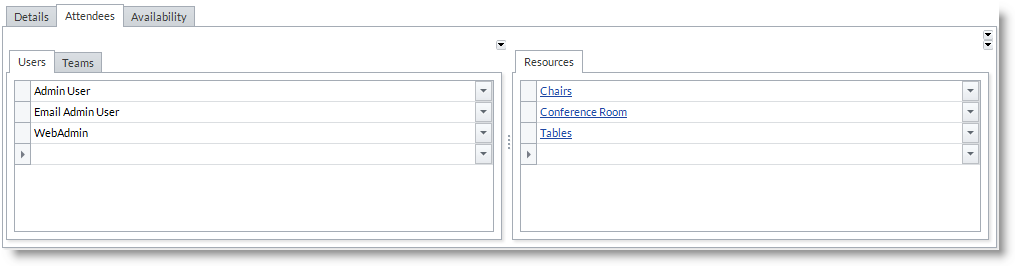
- Switch to the Attendees tab.
- Select the users or teams expected to attend the meeting and the resources needed in the activity. See Also: Activity Resources.
- By listing the attendees (users or teams) and resources in the Attendees tab, you will be able to know the availability of each in the Availability tab. The attendees are listed in a table showing the duration of the meeting. A red mark indicates that the attendees (users or teams) have another meeting or another activity on schedule that completely or partly covers the time you have set for the meeting.
- You can also send notices or invitations from the Availability tab. See Also: How To > Invite attendees to the meeting
Invite Attendees to the Meeting
You will be able to send invitations/notices to the meeting through email from the Activity from.
- Switch to the Availability tab.
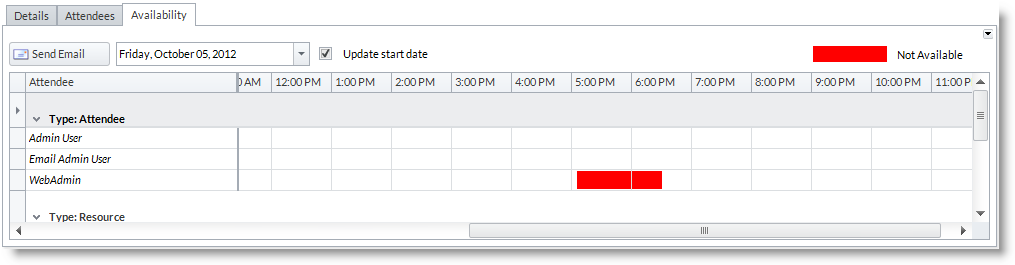
- You may modify and update the start date by selecting a new date in the Date field then tick the Update Start Date checkbox next to it.
- Click on the Send Email button. The system would look for and use the default email setup for the attendees (users or teams) and display the Email/Fax Composer.
- You may add details of the meeting to be held in your message.
See Also: Manage Emails
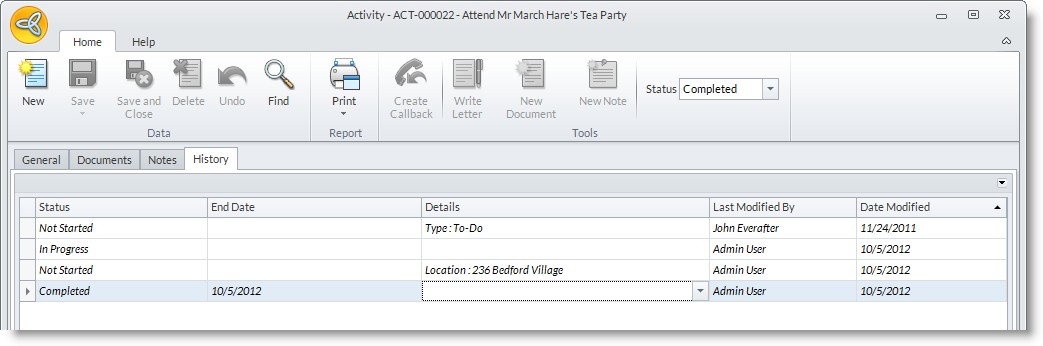
Set Activity Status to Complete
- In the End Date field, you may set the end date and the activity status will be set to Completed.
- In the Status field, select Completed.

Cancel the Activity
- In the Status field, select Cancelled. See screenshot from Set Activity Status to Complete.
Maintain Meeting Activities
- See Also: Maintain Activities
Call
If Call is set as the activity type, you may use the Details tab to log the details to the call. You may also use the Timer for recording the progress of the call.
Schedule a Call
- Select Call as the Activity Type.
- Provide the details of the call activity. See Also: Schedule and Manage Activities

Set a Call Reminder
- From the Activity form, click on the Set Reminder info checkbox and enter the reminder interval e.g. every 30 minutes. When in the Activity Calendar, the reminder will set off at the intervals you specified.
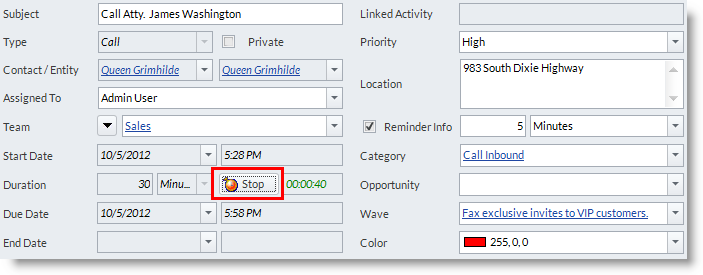
Log Call Time
- When taking the call, you can log the call time using the Timer button. Click on the Timer button next to the Duration field.
- Click on the button again the stop the timer. The call time will appear in the field next to the Timer button and the activity status will be set to In Progress.
Set the Call Status to "Completed"
- From the Status field, set the activity status to Completed.
Cancel the Call
- From the Status field, set the activity status to Cancelled. See screenshot from Log Call Time.
View Call Activities in the Activity Calendar
- From the CRM module, click on the Switch Dashboard option and select Calendar. The buttons on the right of the calendar displays the sliding panes. See Also: View Activity Calendar
- Click on Callback pane to view a list of callback activities.
Maintain Call Activities
- See Also: Maintain Activities
Callback
If Callback is set as the activity type, you may add all necessary details in the Details tab.
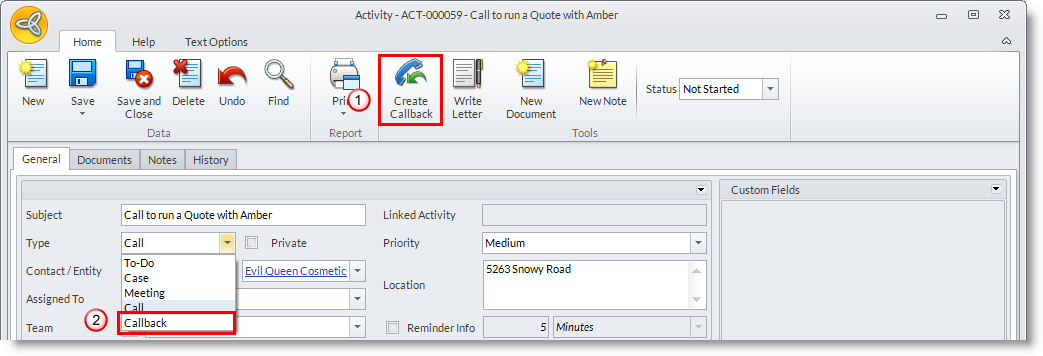
Create a Callback Activity
- To create a callback activity, you can either click on the Create Callback button from the menu of the Activity form or set the Activity Type to Callback.
- Provide the details to the callback activity.
See Also: Schedule and Manage Activities
Set a Callback Reminder
- Click on Set Reminder Info checkbox and enter the reminder interval e.g. every 30 minutes. When at the Activity Calendar, the reminder will set off at the intervals specified.
Log Call Time
- When taking the call, you can use the Timer to log the call time. Click on the Timer button next to the Duration field.
- Click on the button again to stop the timer. The total call time will appear in the field next to the Timer button and the Callback activity status will be set to In Progress.
Set Callback Status to Complete
- From the End Date field, set the end date for the callback. The callback status will be set to Completed.
- From the Status field, select Completed.
Cancel the Callback
- From the Status field, select Cancelled.
View Callback Activities in the Calendar
- From the CRM module, click on the Switch Dashboard option and select Calendar. The buttons on the right of the calendar displays the sliding panes. See Also: View Activity Calendar
- Click on Callback pane to view a list of callback activities.
Maintain Callback Activities
- See Also: Maintain Activities